Planetary Geometry
Overview
The Planetary Geometry tool is used to highlight dates on a chat where various geometric aspects of selected Planets and other astrological objects have occurred. The geometric aspects range from fairly simple formations, such as a T-Square, to more complex and rare alignments, such as the Grand Sextile and Flying Eagle.

To add the tool to your chart, select the tool from the Volume tool group, and left-click on the chart or indicator on which you wish to add the tool. Optuma will then draw the tool using the default settings.
Scripting Function: PGT()
Actions & Properties
Actions
Add to Toolbar: Click this action to add the selected custom Planetary Geometry to your custom toolbar.
Apply Settings to All: When multiple Planetary Geometry tools have been applied to a chart, page or workbook, this action can be used to apply the settings of the one selected to other instances of the tool. This is a great time saver if an adjustment is made to the tool – such as hiding or adding levels- as this allows all the other Planetary Geometry tools in the chart, page or entire workbook to be updated instantly.
Copy Data to Clipboard: Will copy the tool’s values to the clipboard which can then be inserted into a spreadsheet, for example, allowing for further analysis.
Copy Tool: Allows you to copy the selected Planetary Geometry, which can then be pasted onto a different chart window.
Move to Back: If the symbols of the tool are displaying in front of other tools or indicators clicking this action will move the symbols view to the background.
Move to Front: If the symbols of the tool are displaying behind other tools or indicators on the chart, clicking this action will bring the symbols to the forefront.
Restore Default Settings: Click this action if you have adjusted the default settings of the Planetary Geometry, and wish to return to the standard properties originally installed with Optuma.
Save Settings as Default: If you have adjusted any of the Planetary Geometry Properties (colour, for example) you can save the adjustments as your new default setting. Each time you apply a new Planetary Geometry to a chart, the tool will display using the new settings.
Set Time Alert: Sets a time alert for the selected symbol. For more information on Time Alerts, click here.
Delete: Delete the Planetary Geometry tool from the chart.
Properties

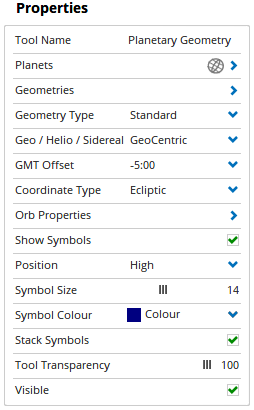
Tool Name: Allows you to adjust the name of the tool, as it’s displayed in the Structure Panel.
Planets: Selects what planets and/or planetary bodies are to be included in the Planetary Geometry calculation. Note that this property has a unique feature, where clicking a planets checkbox twice will display a double tick icon.When a planet displays a double tick, it means it must be included in any of the selected geometries that display on the chart.
Geometries: If the Geometry Type is set to Standard then the following Geometries can be selected: Grand Trine, T-Square, Yod, Mystic Triangle, Cardinal Cross, Golden Rectangle, Kite, Grand Sextile, Flying Eagle, Pentagram, Star of David, and Gann Emblem.
Geometry Type: Set the Geometry type between either Standard or Custom.
Geo / Helio / Sidereal: This setting allows you to change the Planetary Geometry setting between GeoCentric, HelioCentric, and Sidereal.
GMT Offset: Use this option to adjust the Planetary Geometry time zone setting for a specific market. Select the required GMT setting and the
Planetary Geometry will automatically update.
Coordinate Type: Select between Ecliptic (Longitude & Latitude) or Equatorial (Right Ascension & Declination).
Orb Properties: Expands to display the properties of the Orb, the following items can be adjusted:
Show Orbs - Enables you to show or hide the orbs.
Orb - This setting allows you to adjust the acceptable variance for the Planetary Geometry.
Orb Transparency - Use this slider bar to adjust the transparency of the Orb. Moving the slider to the left will increase the transparency.
Full-Size Height - When selected the Orb will extend the full length of the chart, but not across indicators that are displayed in a separate view such as volume.
Orb Over All Views - When selected the Orb will extend the full length of the chart and will also extend to tools that are displayed in separate views, e.g. volume.
Number of Planets: If the Geometry Type is set to Custom then you can manually configure the number of planets to be used in the Planetary Geometry calculation.
Angle 1: If the Geometry Type is set to Custom then you are able to manually nominate the Angle 1 value.
Angle 2: If the Geometry Type is set to Custom then you are able to manually nominate the Angle 2 value.
Angle 3: If the Geometry Type is set to Custom then you are able to manually nominate the Angle 3 value. The Angle 3 value can only be adjusted when the number of planets is set to 4 or higher.
Show Symbols: When selected the Natal Symbols will be displayed on the chart.
Position: Use this option to adjust the position of the Planetary Geometry symbols. The following positions can be selected: High, Low, Top, Bottom or Floating.
Symbol Size: Allows you to adjust the size of the Planetary Geometry symbols. Moving the slider bar to the right increases the Symbol size.
Symbol Colour: Allows you to adjust the colour of the Planetary Geometry symbols colour.
Stack Symbols: When multiple Planetary Geometry symbols are added to a chart, this property allows you to stack them instead of having them appear in front of each other.
Tool Transparency: Use this slider bar to adjust the transparency of the tool. Moving the slider to the left will increase the transparency of the tool.
Visible: Un-tick this checkbox to hide the tool from the chart.